PROJECT: UltiStudent
1. Overview
UltiStudent is a student application that effectively tackles the problem of having too many applications to manage their school life by providing a centralised platform for them to manage their homework, cumulative average point and notes.
UltiStudent is catered for students who prefer to use a desktop app for managing their school activities through a Command Line Interface (CLI) while still having the benefits of a Graphical User Interface (GUI).
2. Summary of contributions
-
Enhancement:
-
Added the ability to add homework to homework manager through the use of
add-hwcommand.-
It allows the user to add homework to the homework manager. This feature is essential and the foundation of homework manager as it enables homework manager to start keeping track of user’s homework.
-
This functionality was a challenging as it requires an in-depth analysis and understanding of AddressBook-Level4’s UI, Logic, Model and Storage. A need to understand how each component communicate with one another.
-
Credits: AddressBook-Level4’s add functionality was being used as a reference.
-
-
Added the ability to edit and save note for Notes Manager through the use of
edit-noteandsave-notecommand.-
A core functionality for NotesManager.
-
This allows the user to edit the content of the empty note that was created using
add-note. -
Credits: AddressBook-Level4’s select functionality was being used as a reference.
-
-
-
Minor enhancement:
-
Code contributed: Click here to view my code on the CS2103T Project Code Dashboard.
-
Other contributions:
-
Project management:
-
Managed issue tracker, closing issues upon fixes and implementations.
-
Refracted addressbook to ultistudent (Pull Request: #167)
-
-
Enhancements to existing features:
-
Documentation:
-
Community:
-
3. Contributions to the User Guide
Below are the main contributions to the User Guide, which consist of Add Homework, Edit and Save commands. They showcase my ability to write documentation targeting end-users in a clear and concise manner. |
3.1. Adding a homework: add-hw
Format: add-hw mc/MODULECODE hw/HOMEWORK d/DEADLINE
Have a homework but unable to attend to it immediately? No worries! Let Homework Manager help
us keep track of them! By using add-hw, we can command this manager to remember our homework
for us! Make sure we are in the Homework Manager by using open HomeworkManager first.
Sadly, it doesn’t do our homework for us… but hey it reduces our worries on forgetting our homework!
To use this command we have to adhere to this format: add-hw mc/MODULECODE hw/HOMEWORK d/DEADLINE
else Homework Manager would not be able to understand what we are trying to tell it to do.
|
DEADLINE must be in dd/mm/yyyy format and DEADLINE should not be a date that is before today! Homework are considered duplicated only if they have the same MODULECODE, HOMEWORK and DEADLINE. |
Okay enough explanation and time for an example!
Lets say we have to do Tutorial 1 for CS1101S by 1st May 2019. We could command this manager to
remember it for us by using add-hw mc/CS1101S hw/Tutorial 1 d/01/05/2019 in the command box (red highlighted box)
and do make sure that you are in the homework manager by checking if the Homework icon is highlighted in the
nagivation bar (white highlighted box) as shown below.
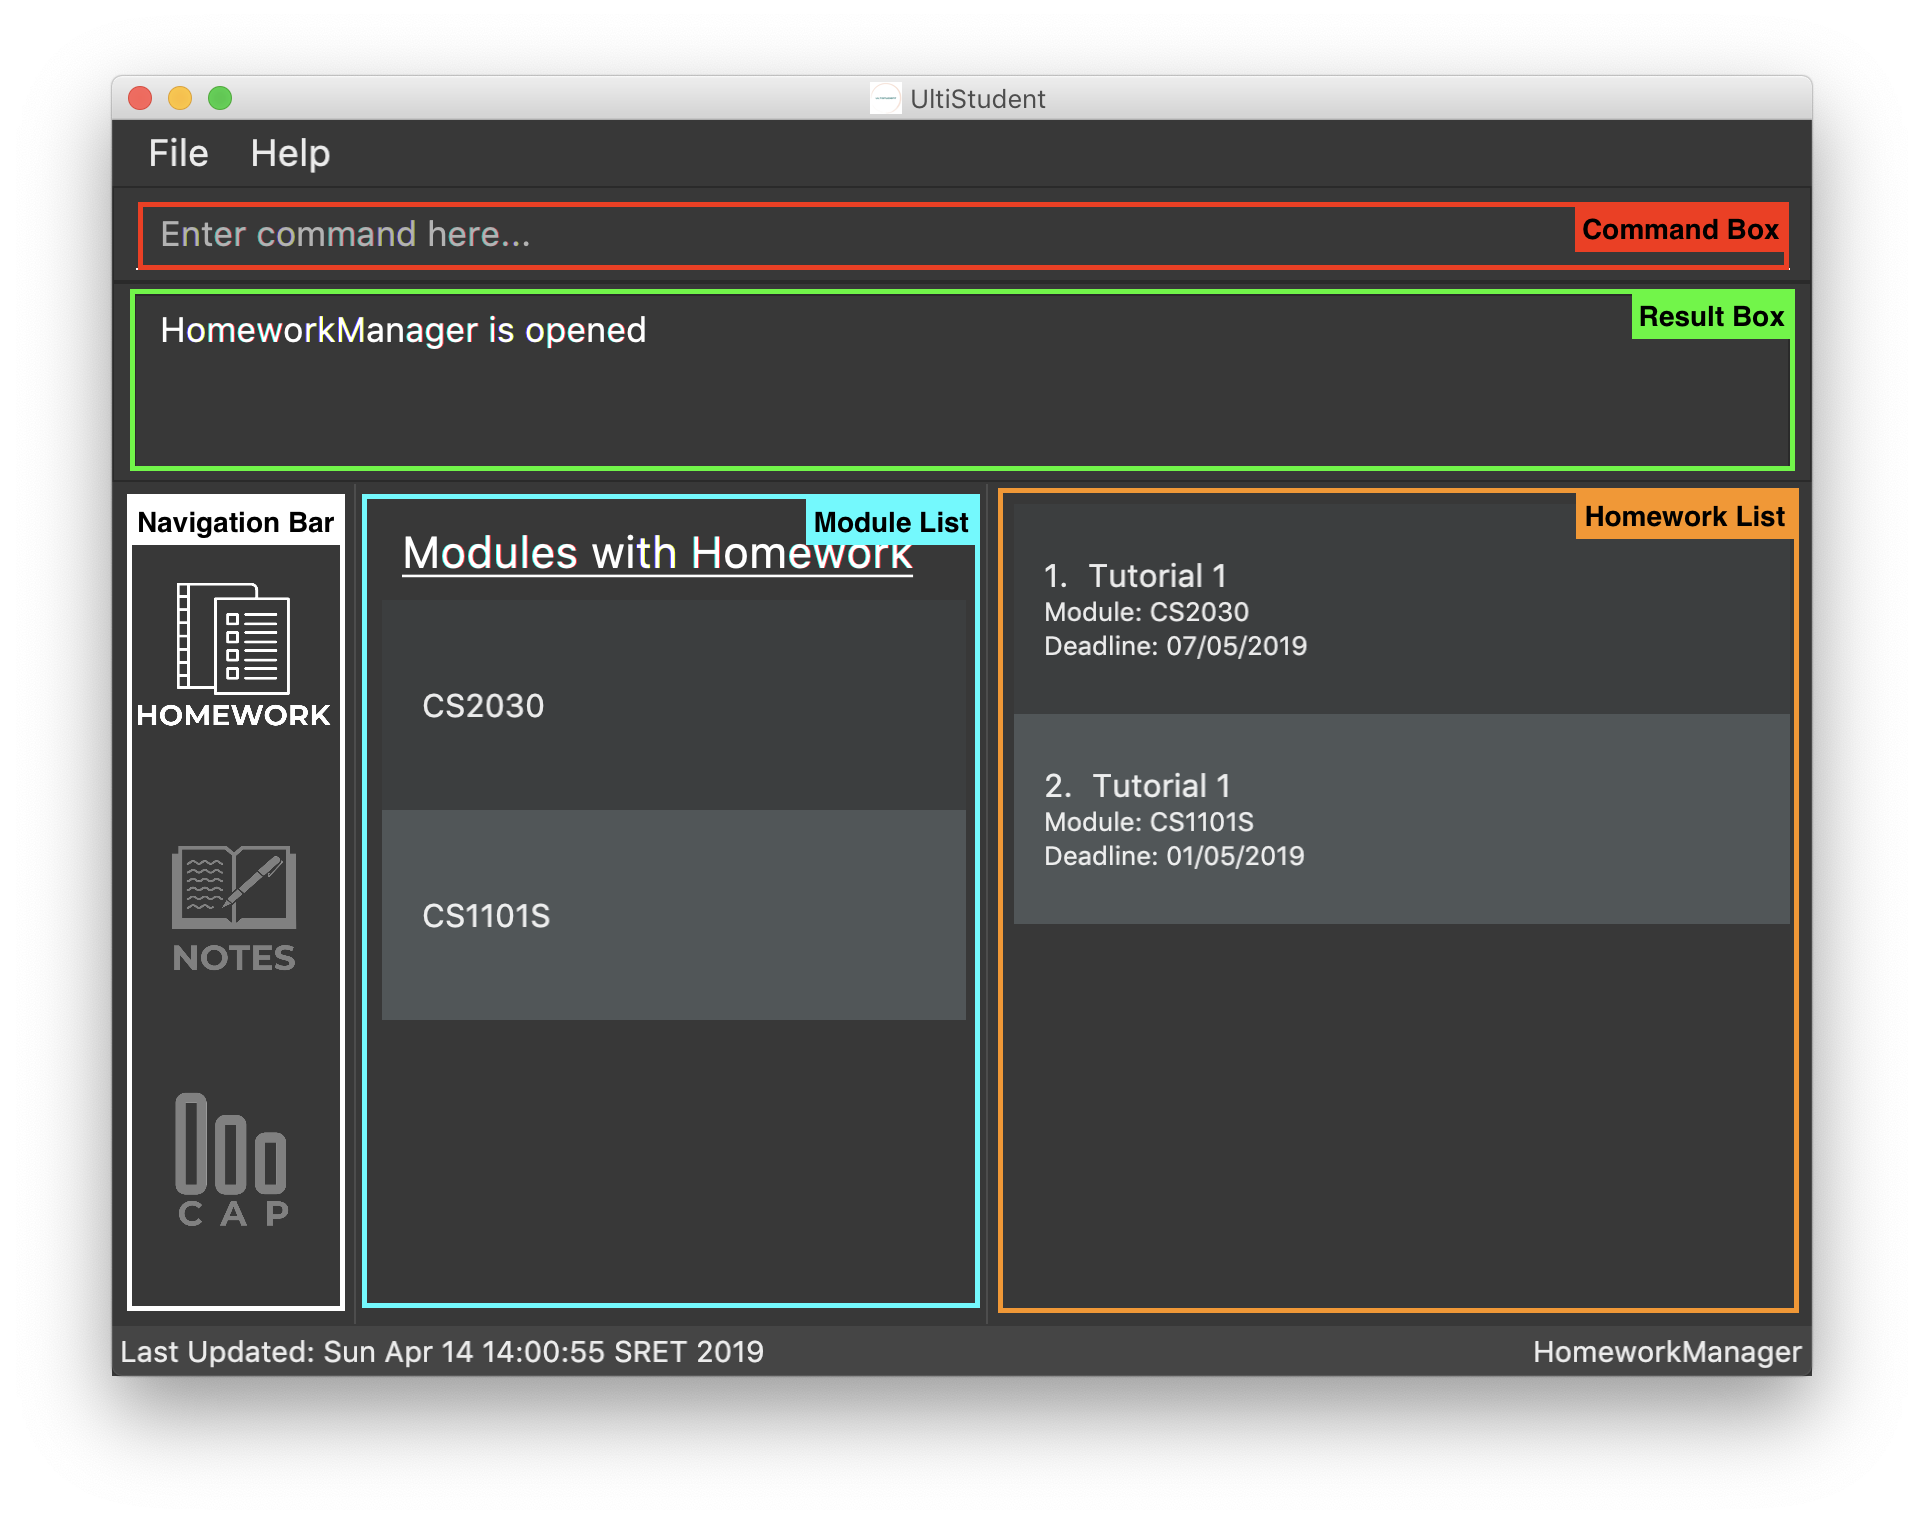
When CS1101S tutorial 1 has been successfully added, the Result Box (green highlighted box) would display
New homework added: CS1101S; Tutorial 1; 01/05/2019;.
We will also be able to view the CS1101S being added into the Module List (blue highlighted box) since this is the first homework for CS1101S we have and the Homework List (orange highlighted box) would show us the newly added CS1101S homework.
Pro tip here! The ordering of mc/MODULECODE, hw/HOMEWORK and d/DEADLINE can be jumbled around!
so do not worry that this handy manager will not understand what you are trying to command it to do!
|
| Sadly Homework Manager is english educated only… Therefore it only accepts english characters and numbers. Maybe Homework Manager would be educated in other languages to accept other characters in future! |
3.2. Editing and Saving a note : edit-note save-note
Editing note: edit-note
Format: edit-note
Hurray! We’ve successfully added a note therefore it is time for us to learn how to edit and save the edited notes! But first! we got to make sure we are in the Notes Manager by looking at the Notes icon in the Navigation Box (white highlighted box) as shown below.
Now that we are in the Notes Manager. It is time for us to start editing our note! First off, we have to use
edit-note INDEX to select the notes that we want to edit.
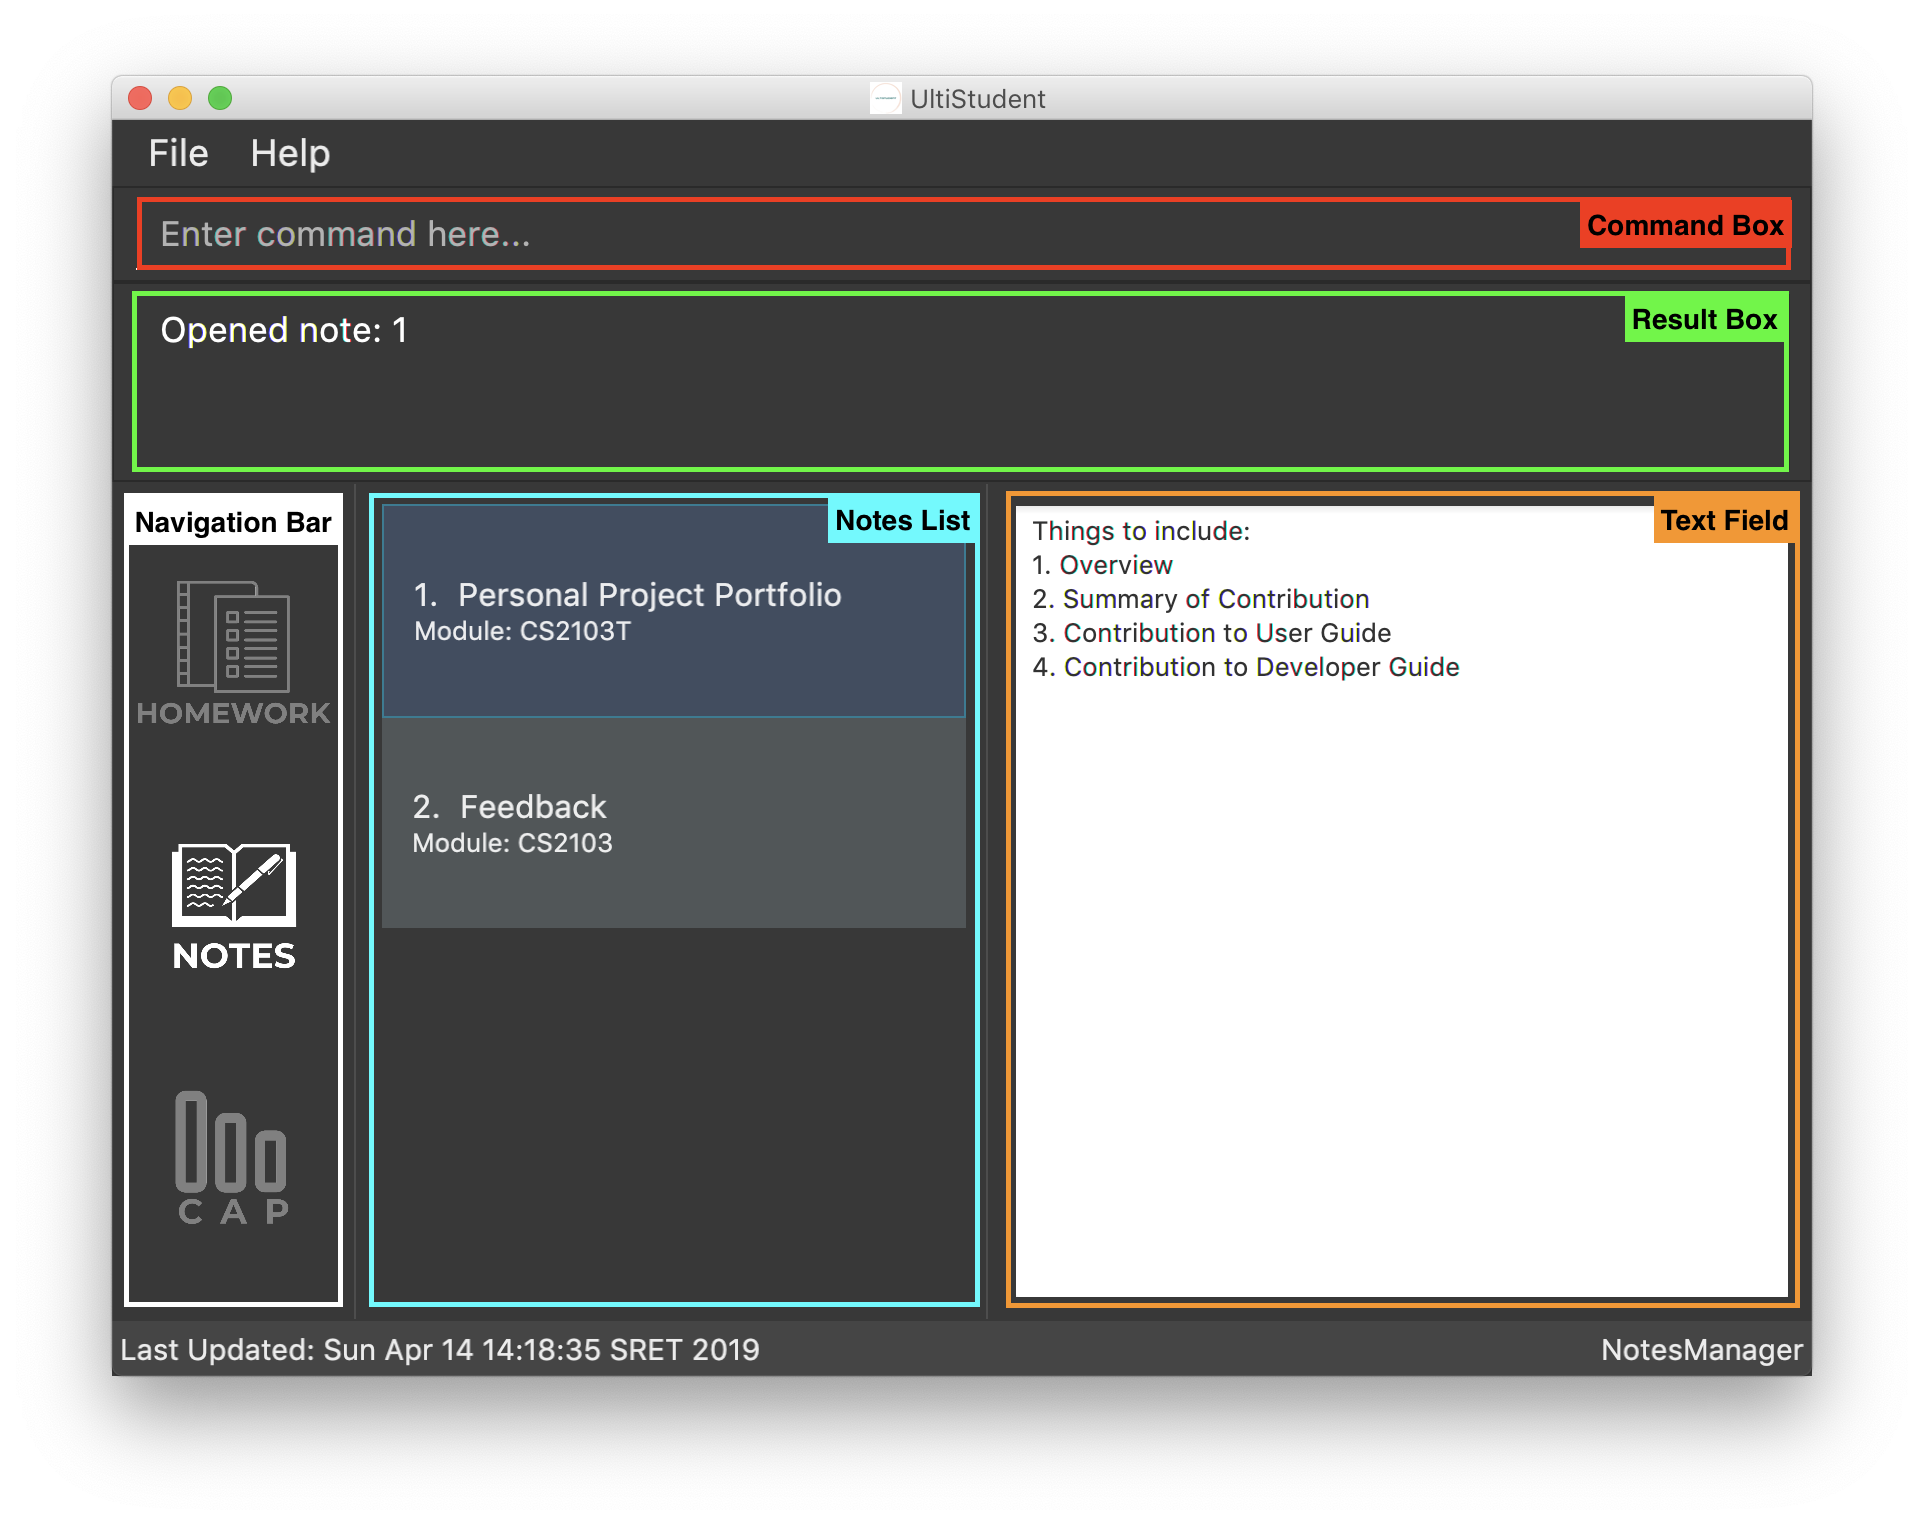
For example, we have 2 notes currently as shown in the image above, and we would like to edit our Personal
Project Portfolio note. We will use edit-note 1 in the Command Box (red highlighted box) to open Personal
Project Portfolio note for editing.
When Notes Manager has successfully open our note, it will display Opened note: 1 in the Result box (green
highlighted box). At the same time, the note will be highlighted in blue in the Notes List (blue highlighted box)
and the Text Field (orange highlighted box) will be activated and turn white, allowing us to start jotting down
our notes!
Saving note: save-note
Format: save-note
Now that we are done editing our note, it is time to save them! We can do this easily by using the save-note in
the Command Box (red highlighted box)!
Once the note is saved, Notes Manager will let us know by displaying Saved note, Module: CS2103T Note: Personal
Project Portfolio Content: …(notes that we wrote) in the Result Box (green highlighted box). At the same time,
the Text Field (orange highlighted box) will be disabled and turn grey.
For save-note there is no parameters as it will save all edited notes in notes manager.
Pro tip here! We can edit multiple notes at the same time by using edit-note 1 then edit-note 2 to open the
respective notes to edit. Once we are done editing, we can simply use save-note to save all the edited notes!
|
| For data integrity, undo and redo commands are not supported on editing and saving notes. Changes must be made manually. |
4. Contributions to the Developer Guide
Below are the main contributions to the User Guide, which consist of Add Homework, Edit and Save commands. They showcase my ability to write technical documentation and the technical depth of my contribution to UltiStudent in a clear and concise manner. |
4.1. Adding a homework: add-hw
The add homework feature is a core feature to the Homework Manager of UltiStudent. Which allows the users to create a homework object in UltiStudent. |
4.1.1. Overview
The add homework add-hw mechanism is facilitated by AddHomeworkCommand and AddHomeworkCommandParser.
It takes in the following input from the user: ModuleCode, HomeworkName and Date, which will
construct individual objects that construct a Homework object.
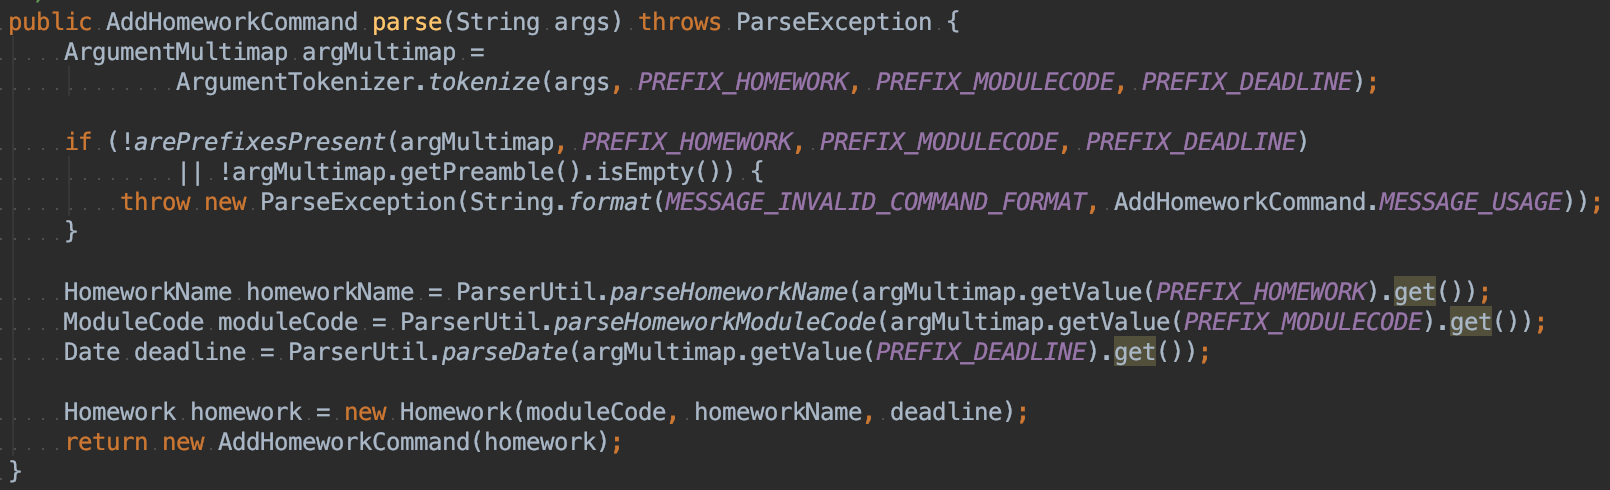
The AddHomeworkCommandParser implements Parser with the following operation:
-
AddHomeworkCommandParser#parse()- This operation will take in aStringinput from the user that will create individual objects based on the prefixes 'mc/', 'hw/' and 'd/'. TheStringvalue after the individual prefixes will create the respective object: 'mc/' forModuleCode, 'hw/' forHomeworkNameand 'd/' forDate. A validation check will be imposed upon the creation of each object. Any checks that fails the validation would prompt the user on the failed component. For example:-
ModuleCodewould useParserUtil#parseHomeworkModuleCode()to ensure that user has input 2 letters followed by 4 digits with an option to include a optional letter after the 4 digits. -
HomeworkNamewould useParserUtil#parseHomeworkName()to ensure that homework name is not a null. -
Datewould useParserUtil#parseDate()to ensure that user has entered a date that is either a present or future date.
-
-
After validation checks are completed with no errors, a
Homeworkobject is then constructed withModuleCode,HomeworkNameandDateas the parameters -
AddHomeworkCommandParserwould then return aAddHomeworkCommandobject with theHomeworkas the parameter
Take a look at the code snippet of AddHomeworkCommandParser below for an illustration:
4.1.2. Example
Given below is an example usage scenario of how add-hw mechanism behaves at each step.
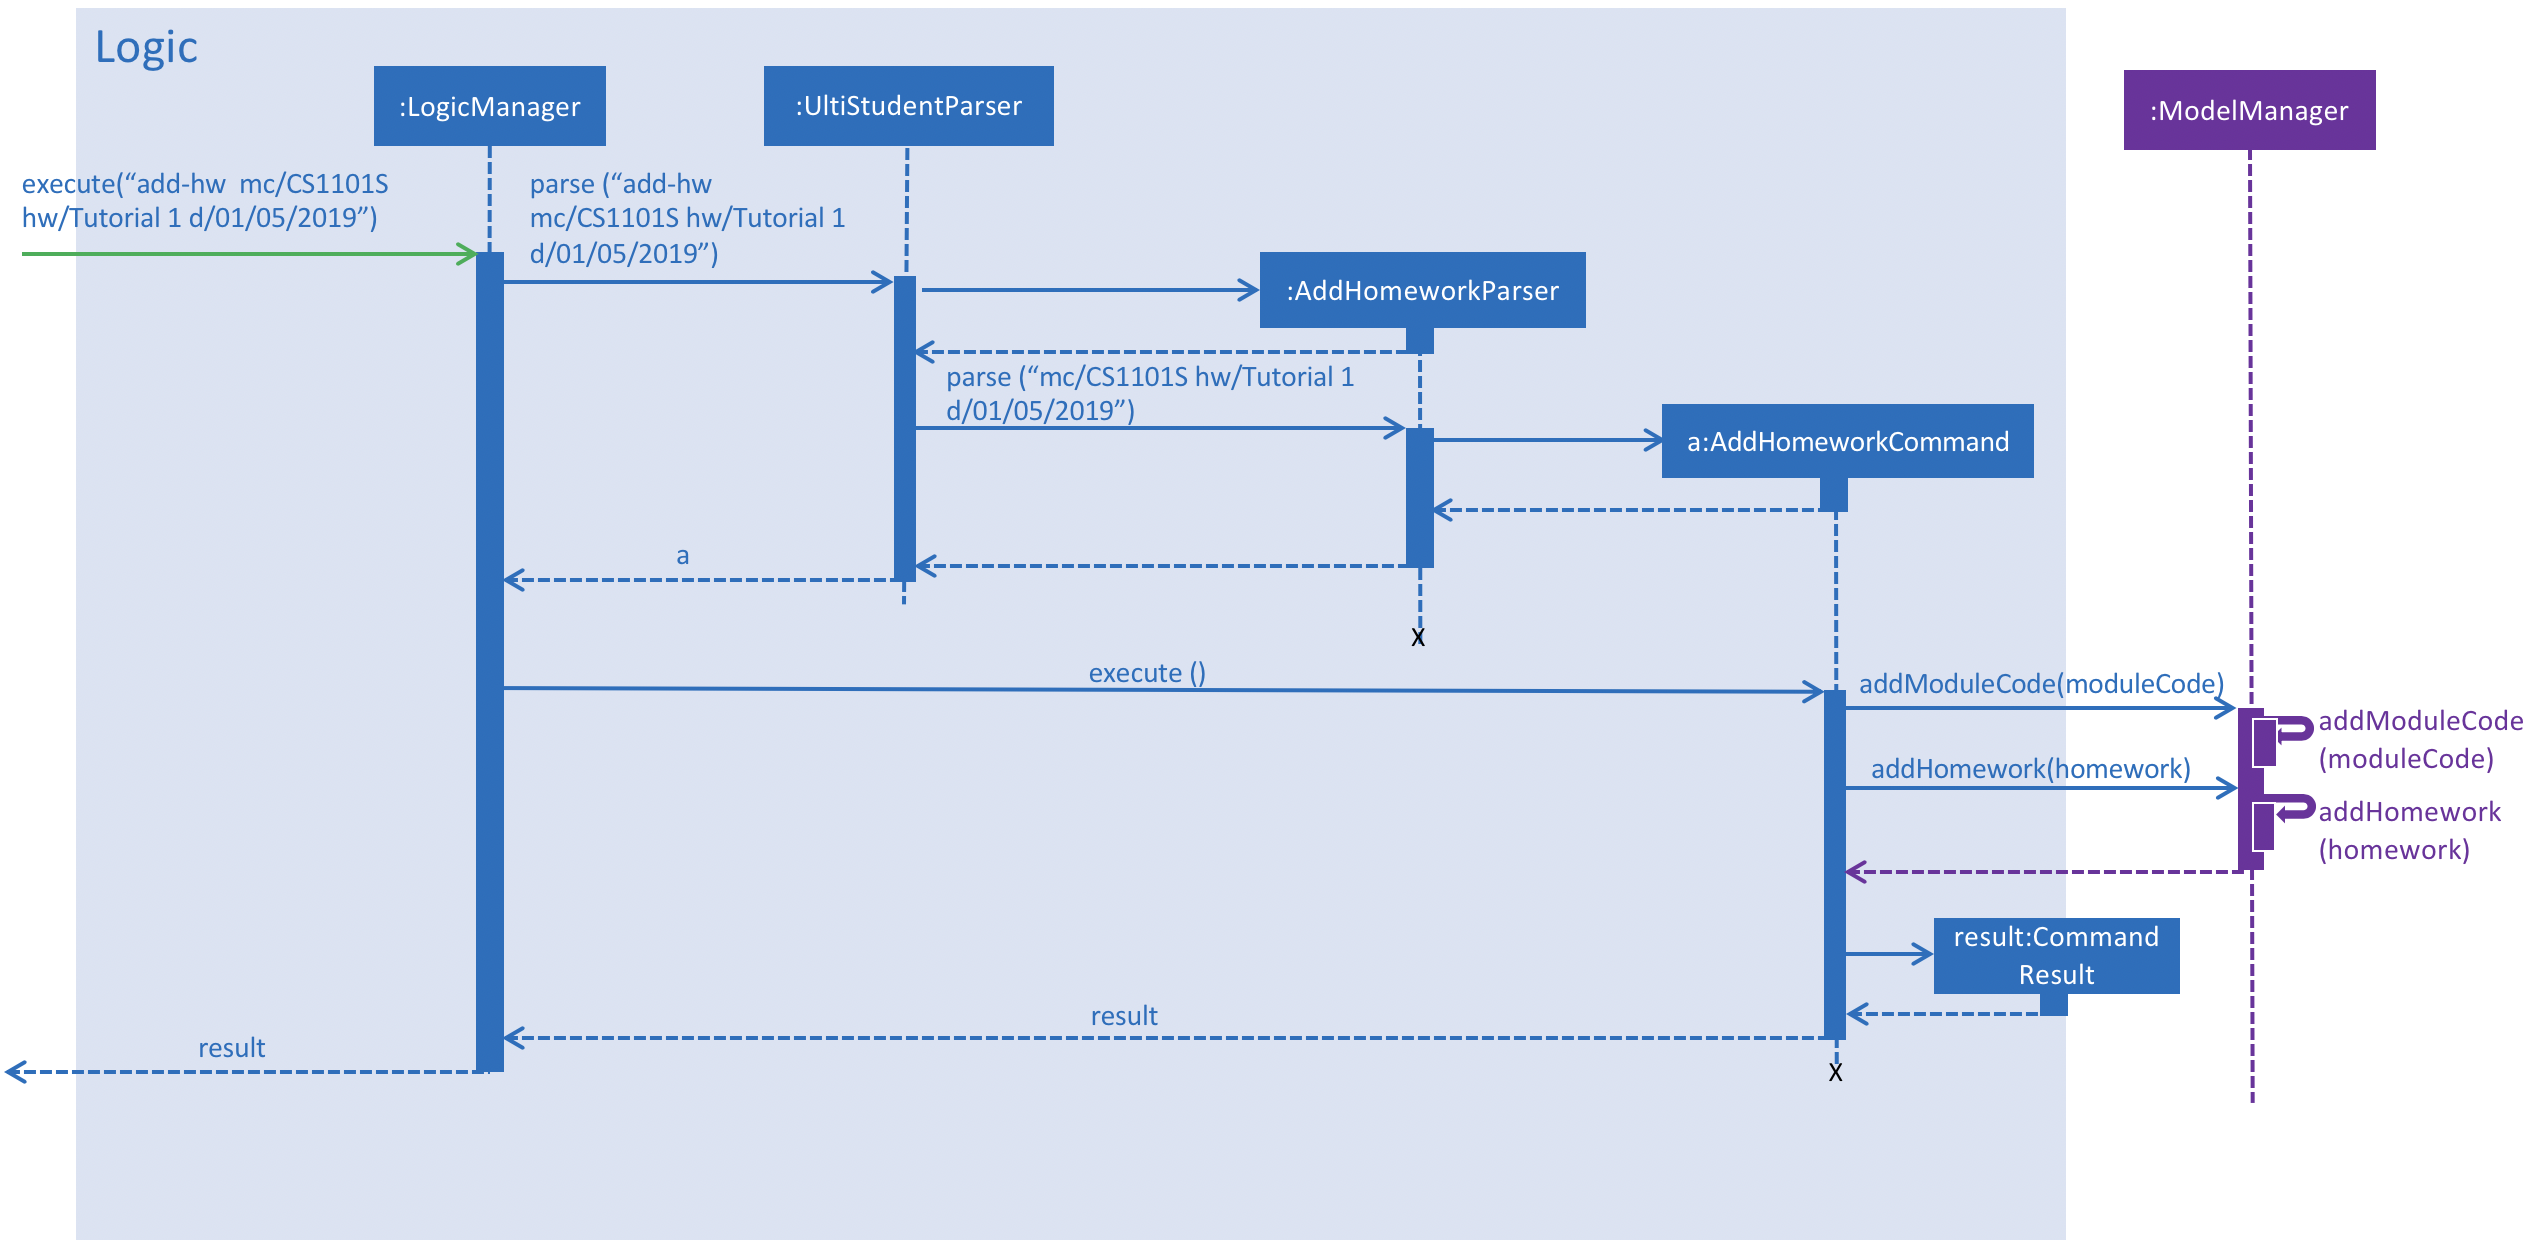
Step 1: The user executes add-hw mc/CS1101S hw/Tutorial 1 d/01/05/2019 to add a CS1101S Tutorial 1
homework with the deadline on 1st May 2019.
Step 2: LogicManager would use UltiStudentParser#parse() to parse the input from the user.
Step 3: UltiStudentParser would determine which command is being used and creates the respective
parser. In this case, AddHomeworkCommandParser is being created and the user’s input would be pass in
as a parameter.
Step 4: AddHomeworkCommandParser would do a validation check on the user’s input before creating
and returning a AddHomeworkCommand object with Homework as the parameter.
Step 5: LogicManager would use AddHomeWorkCommand#execute() to add the
ModuleCode and Homework
into the Model which is handled by ModelManager
Step 6: AddHomeworkCommand would return a CommandResult to the LogicManager which would then
be return back to the user.
The image below illustrates the scenario of when the user executes add-hw mc/CS1101S hw/Tutorial 1
d/01/05/2019:
add-hw4.2. Editing and Saving a note : edit-note save-note
These two feature allows the user to edit existing note and save them after editing. |
4.2.1. Overview
The edit-note command helps the user to open the selected notes to allow the user to start editing its content
by displaying all the content on the NotesManagerMainPanel which is a text field. It requires the need of the
save-note command to help save the user’s edits
Below is an activity diagram of how the users use edit-note and save-note to facilitate adding contents to
their existing notes:

edit-note and save-noteStep 1: User will key in edit-note INDEX on the command line
Step 2: System will do a validation check to see if INDEX of note exist in the list of notes in the Model.
If note does not exist, it will throw a ParserException to the user. Else note will be opened and proceed to
step 3.
Step 3: Once it is opened, NotesManagerMainPanel will be enabled, allowing the user to start typing their
notes in the text field.
Step 4: When the user is done editing, he/she can use save-note in the command line to save the edited
content to the opened note.
Step 5: Upon successful save, NotesManagerMainPanel will be disabled and user will not be able to type
anything on NotesManagerMainPanel
4.2.2. Design Considerations
Options |
Pro |
Cons |
1. Users to type their content on the command line |
- Easy implementation |
- Not user friendly |
2. Users to type their content on the |
- User friendly |
- Two sources of input, Command Line and TextField |
Option 2 is being selected and implemented as we focus on the users convenience and the ability to edit their notes easily. Separation of command line and notes text field would reduce the number of commands the user has to remember and there will be lesser confusion of command line mode or text input mode.